
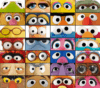
The eyes make a puppet. Using the right materials and getting the proper placement of the eye and the pupil on the eye is the key to creating a great puppet.
Table of Contents
What materials can I make eyes out of?

Plastic Spoons. Plastic spoons come in a variety of sizes and shapes. They are one of the most common materials used for puppet eyes.
To use a spoon, you cut off the handle with scissors or your Dremel tool. You will want to sand the edge where you cut. The spoon bowl can then have an adhesive pupil attached or you can drill a hole in the spoon and insert a teddy bear eye.


Craft Foam. Craft foam can be used for the whites of the eyes and for the pupils. For pupils, you may also want to create an iris from one color foam, say blue, and then attach a black pupil. You may create the whites of the eyes with the craft foam and then attach a teddy bear eye.
Buttons. Buttons can make interesting eyes. Dome-shaped buttons with the single eyelet on the back work really well. Just remove the eyelet with your Dremel and sand the back smooth and the button can be glued to the puppet or to the whites of the eye as a pupil.
Teddy Bear or Doll Eyes. Teddy bear eyes are plastic eyes that have a colored iris and a dark pupil. They have a post on the back and little washers that lock onto the post to hold the eye in place.
These eyes can be used alone or integrated into a larger eye using a plastic spoon or other material for the white of the eye.
Teddy bear eyes are available at craft stores an come in a variety of sizes and colors.
Ping Pong Balls. Ping pong balls can be used as they come or cut in half. The ink on the ball can usually be removed with a little rubbing alcohol. Balls can be attached using hot glue or contact cement. Pupils made from adhesive vinyl or adhesive velvet or felt can be attached to the ball to complete the eye. You can also use teddy bear eyes, but you will need to drill a hole for the post.

Cast Eyes.
1) Molded Puppet eyes can be made in molds. Some puppeteers use silicone candy or soap molds while others create their own molds.
To mold eyes, you will need OOMOO 30
and Smooth Cast Plastic.
You will also need a blank for your eyes. You can make blanks from plastic spoons, from plastic measuring spoons, from plastic eggs and alsmost any other item which has the size and shape you want.
I used plastic measuring spoons when I made my molds. I cut the handles of the spoons and sanded them smooth. A set of six spoons gave me six different sizes. I placed the spoon bowls face down in a box that my personal checks came in.
Mix the OOMOO 30 according to the instructions and pour into the box until the spoons (or your blanks) are covered. Let set over night.
Once the silicone sets, you are ready to cast eyes. Just mix the Smooth Cast according to the instructions and pour into your mold. It sets pretty quickly and you will have perfect eyes ready to go on your puppet.

2) Vacuum Formed. Some puppet makers use dental vacuum forming machines to create eyes. Once you have your original for your eye, you can make as many as you need quickly and cheaply. The vacuum forming machine though will run you about $300 dollars. Be sure to get a two-post machine. This will ensure you get perfect eyes every time.

Premade eyes. Premade puppet eyes are also available. You can find them in some craft shops and also online. The one problem with these is you cannot place the pupils where you want, as they come prepainted on the eye.
How To Make Pupils
Self-adhesive velvet – I love self-adhesive velvet for pupils.
To punch out perfect circles, I have an assortment of paper punched that scrapbookers use.
Self-adhesive vinyl for Cricut machines also works well and will give your pupils a little shine. You can also put a smaller dark circle on a larger colored circle of vinyl to create an iris and pupil.
When attaching the pupil to the eye, place the adhesive material on the end of a needle. Place the pupils on the ye, and adjust until you get the placement you want. By using the needle, you can lightly put the pupil in various places until you are happy. Then the pupil can be pressed down and the needle slid away.
Pupils can also be painted on or you can use buttons or doll eyes.
Highlights – A little white dot at the top of the eye simulates a light reflection on the eye. You can make a perfect little circle on your pupil with the round head of a straight pin. Be sure the highlights are on the same spot on each eye and not mirrored to one another. The highlights suggest light reflecting off the ye, thus the light would be coming from the same direction on each eye.

Topstick Clear Hairpiece Tape is a two-sided tape used with toupees. It also works great for attaching pupils to the eyes of your puppet.
If you use a hole punch to make your pupil, just punch an identical size out of Topstick. Attach this disk to the back of your pupil and attach the pupil to the eye.
Use a needle or pin when placing adhesive pupils to your puppet. Put the tip of the needle just under the pupil, sticking slightly to the pupil. You can then place the pupil on the eye more precisely.
If the pupil is off, by lifting the needle, you can lift the pupil and re-adjust it. Once the pupil is properly placed, you can slide the needle off and press the pupil down into place.
Creating Eyelids
Eyelids can be made of fleece. The fleece color may match or contrast the puppet’s face, depending on the look you are going for. You can also use thin craft foam. This will give you a choice of many different colors.
Topstick can again be your secret weapon here. Eyelids can be glued to the puppet eye with contact cement or hot glue, but Topstick is quicker and easier.
Place the Topstick on the back of your eyelid material. Do not cut the material to size before it is on the eye.
Stretch the eyelid across the eye, finding the position you want. Once the eyelid is properly placed, then trim the eyelid around the edge. You can also put a little hot glue or contact cement on the back of the eye and stretch the eyelid material around the top of the eye and onto the back. This will give you some material to glue your eye to the puppet.
You can place eyelids on the top and bottom of the eye, or just on the top.
A thin strip of self-adhesive velvet or craft foam can be placed on the edge of the eyelid. This can really make your eye pop and look great! If using craft foam, again Topstick is your friend.

Pipecleaner can also be used to line the eyelid, giving an eyelash effect. If you fold the pipe cleaner over itself three or four times and then twist the pipe cleaner around itself several times, you will get a nice size for eyelashes.
Eyelashes
You can purchase doll eyelashes or doll eyelash strip to add eyelashes to your puppet’s eyes. With girl puppets, this is a nice touch. You can also use false eyelashes.
Craft foam can also be used to make eyelashes.
Eyebags.
Eyebags go below the eye, not on it. To make an eye bag, cut a crescent piece of fleece to the desired size and Topstick or glue it below the eye. Experiment with various sizes and designs until you get the look you want.
You can also carve an eyebag out of foam and cover it with fleece.
Eyelids, eyebags, eyelashes and eye highlights all add to the character of the puppet you are building. Add as many or few of these features as you want, but be careful not to create a “salad bar” face, by over-doing the features. Sometimes the simplest look is the best look.
How to attach the eyes to the puppet.
There are several ways to attach the eyes to your puppet. If using teddy bear eyes, you can poke a hole through the puppet head and use the eye post and lock washer to attach it. Tightening down the washer will also pull the eye into the foam a little, creating an eye socket.
You can also use hot glue or contact cement to attach the eyes. Double stick tape, like Topit, is great for holding eyes in place, yet will allow you to move them or replace them later.
Proper placement of the eyes – the Muppet Triangle. Placement of the eyes on the puppet is crucial. Don Sahlen developed what became known as the Magic Triangle or Muppet Triangle. This is the placement of the eyes to create focus.
In the Muppet Triangle, the pupils are slightly cross-eyed, not centered and looking forward. The perfect set-up creates an equilateral triangle between the two pupils and the end of the puppet nose.
The important thing when placing the eyes is that they appear focused on you when you look straight on at the puppet face.
To learn how to make puppet eyelashes, see my article HERE.
Here is a short video I made about the various puppet eyes I have used.
Be sure to check out my RESOURCES page here to find the materials and tools I use. CLICK HERE
Turning Puppets Into Profit: https://amzn.to/3vJ5GqC
