Latex is a great alternative to fleece for covering a puppet. Latex is durable, long-lasting and easy to apply, making it the perfect covering for your puppet.
Latex is colored with acrylic paint and applied directly to the foam of your puppet with a brush or foam square.
Monster latex comes in white. You can color it with acrylic paint.
Pour some liquid latex into a cup or bowl.
Add acrylic paint of your desired color a few drops at a time.
Stir the latex to color it with a popsicle stick or other item.
Add more paint, a little at a time until you get the desired color.
How To Apply The Latex To The Foam
You can brush the latex onto the foam with a brush. I have found I get better results when I dab the liquid latex on with a scrap piece of foam.
Make your first coat thin. Let dry for several hours, or overnight. Once the latex has dried, add another coat. Let dry.
Continue to add coats of latex, allowing it to dry between coats until you get the desired thickness and results.
Working With Latex And Fleece
On my chicken puppet, have a combination of painted foam and liquid latex rubber. I also make puppets covered with fleece that have certain parts covered with latex.
Latex Covered Beak & Comb
Do not apply latex over fleece. It will not give you good results.
If you are applying latex to only a part of the puppet, like a bird beak, either cover the piece with the latex rubber before attaching it to the puppet or use masking tape to mask off where you do not want the latex.
When latex has dried, you can trim edges with sharp scissors or a razor blade.
You can also paint latex rubber after it has dried. Use acrylic paints. You can use paint to add some detailing or to patch a missed spot.
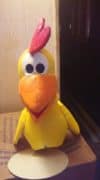
Latex Covered Puppet
On the puppet above, I covered him with yellow liquid latex.
I took some red sidewalk chalk and made a powder by rubbing it on sandpaper. I then brushed the red chalk on his lips to give him red lips. You could also do this with paint.
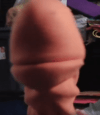
Here is another latex covered puppet head.Puppet Before Latex Covering And After
In the picture above, you see the puppet head when it is bare foam. Then you see the same puppet after it has been covered with yellow latex.
Latex allows me to get the color I want and to create a longlasting, durable cover for the foam. By mixing paints, I can get custom colors.
An Alternative To Liquid Latex
As an alternative to liquid latex rubber, you can use latex tub sealer. This comes in a tube. It is used to caulk tubs and sinks.
To apply the latex sealant, put a generous amount on a plate or piece of wood.
You can color the caulking like you do the liquid latex, with acrylic paint. Just mix it in good.
Apply the caulking to the puppet with a spatula or a piece of stiff plastic. You can cut an applicator out of a plastic cofee can lid.
Just keep applying and smoothing small amounts until your puppet is covered. Let dry.
The caulking can also be painted after it dries. You can add features and shading to get the desired result.
Here is the video I made on constructing various types of puppet noses and the patterns I used in the video. Please remember to subscribe to the blog and go to YouTube to subscribe to my videos.
There is more to working a puppet than just sticking your hand in and flapping the mouth. Here, I will explain many of the secrets to bringing a puppet alive and making your presentation engaging, entertaining and memorable.
This article is about different ideas for visual aids and making it interactive as you communicate what happens, what it means and how it applies.
Table of Contents
Visual aids are a non-negotiable minimum for any talk for children.
That’s because we all remember much more of what we see and hear than what we just hear. And some level of interaction is also pretty crucial because we remember even more of what we do than what we see and hear.
Let’s divide presentation ideas into 3 main categories…all conveniently starting with ‘p’:
Pictures
Props
People
First Pictures.
Pictures are probably the most straightforward approach. They’re particularly good at supporting knowledge of what happens in a Bible passage.
There are some fantastic free resources on the internet. There are also some superb ones which you pay for.
Most of these sites produce images in sets covering a complete Bible passage. You can print them or insert them into a slideshow depending on the facilities you’ve got available.
The disadvantage of this approach is that it’s 2-dimensional or flat. Useful, but make sure you don’t just use pictures every session. And ask what’s happening in the pictures- that can make them more interactive.
Or why not make a video if you have the facilities. Get hold of some simple costumes, make sure your actors know their lines for each clip, try a few ‘takes’ for each clip and then edit it using something like Windows Movie Maker to make it a bit more polished.
Video can be really entertaining and effective. But remember that video is also 2-dimensional, unless you’ve got some really fancy kit, and it gives you even less chance to interact with the children. So, use it to communicate part of your talk. It’s an aid to support your talk, not a substitute for it.
Second Props.
Props are incredibly powerful in helping a Bible passage to come alive for children. And they can be anything that helps make your point. So, use hats, wigs and costumes to dress somebody up as a Bible character, unless that character is Jesus, in which case probably only use a costume if it’s necessary.
For example, if you’re teaching about Jairus’ daughter and the woman who’d been ill for twelve years, it’s important that your Jesus actor is wearing a cloak cos the woman reached out and touched Jesus’ cloak.
You could make a model of the Ark of the Covenant or the temple if that helps to explain a passage. Rig up a curtain that rips in two from top to bottom; use flood lights for the transfiguration; use flash paper for the burning bush; in short, anything that’s available that will help illustrate your talk.
Here are my top 10 props which are used over and over again in lots of different talks:
A Simple toga- type costumes…useful for any Biblical character
Boxes covered in Christmas paper, which open up. Incredibly useful in December.
A Roman soldier costume or helmet … just think how often they appear in gospel passages.
A collection of hats and wigs, which can denote almost anybody.
A cuddly sheep puppet: which goes astray or gets separated from the other 99, or is cared for by the Good Shepherd.
A suit jacket: to show that a character is rich or important; very useful for some of Jesus’ parables.
A tub of plastic coins. It’s amazing how often money comes into Bible passages.
A bed sheet – to lower the paralyzed man through the roof, like a sail on a boat, as a blanket for someone who’s ill, etc.
A crown – for Biblical kings, kings in Jesus’ parables and to explain that Jesus is King.
A cross…and if you can’t think of a reason to use a cross then maybe you’re in the wrong role!
So we’ve looked at pictures, and props and finally people.
We’ve already said that interaction is very powerful. So, plan to get other people involved in your talk. That might be the other adult members in your team who act out certain bits of the talk.
More commonly it’s getting some of the children involved; that could be a simple as asking them to hold a prop or picture. But it’s even better if you can dress them up as characters and then asking them to say key lines at the appropriate times.
Even better if you can get all the children involved somehow – maybe write a simple response poem. You say a line, they say it back to you; you say a line, they say it back etc…or ask them to do sound effects, or ask them to show an emotion like fear, anger, or jealousy.
Finally, it’s easy to fall into the trap of using lots of funky ideas to illustrate what happens in a Bible passage.
But what about the meaning? What about the application? A crown can be very powerful in pointing children to Jesus being King over Everything.
A box of toys and gadgets can be equally powerful in warning children of the dangers of greed.
So, there’s a quick look at presentation ideas.
We’ve looked at how to use pictures, props and people to bring our bible talks alive.
I love to use illusions and magic tricks to demonstrate Bible truths. In fact I have written several books on how you can do this.
How to make your visual aids as effective as possible.
So jumping straight in here’s the key question you need to ask: What is it you need to reinforce?
Remember this above everything else. Since visual aids are visual aids. What they do is reinforce, make more memorable, help to make things clear.
We need to be sure what it is we need to reinforce, make memorable or make clear.
Sometimes it’s someone in the bible passage’s actions.
Sometimes it’s somebody’s words.
Sometimes the words or actions are really clear already and it’s the meaning or application that need visual aids to help to explain.
Let me explain with some examples. You might want to grab a Bible to look up the verses.
So imagine you were planning to teach Genesis 12:1-9. That’s where God tells Abram and Sarai to leave their home country and go to a land He’d reveal to them. And he makes them a promise.
Abram and Sarai
And they did what God asked of them. Now, it’s a journey and there are about 7 place names mentioned in those verses. And we know that Abram took Sarai and Lot and probably, although we’re not told, other family members as well, plus a load of animals.
We could spend hours preparing a map of their journey, or writing place names out to go round the room. We could dress the children up as Abram, Sarai, Lot and everyone else, maybe even sheep and cow masks for their animals. That would be creative and a lot of fun.
Table of Contents
But what are we trying to reinforce with our visual aids?
Well what we really need to reinforce are God’s words, what God says. It’s God’s 3 massive promises in verses 2-4.
It’s about God promising that
He will give Abram countless descendants.
He’ll give them a land to be their home.
That through one of those descendants He’ll do something amazing for the whole of humanity. In other words, send Jesus.
So, where should we invest our time making visual aids? Ideally in something to reinforce God’s words.
Maybe 3 speech bubbles which show the 3 key things that God promised to Abram. And if you’ve got time, grab a dressing gown from somewhere so you can dress up a child to pretend to be Abram.
But the focus is on God’s words.
Now, of course, if you’re working with pre-schoolers who haven’t yet learned to read that would be more difficult.
But why not find a simplified version of God’s promise and learn it as a series of 3 memory verses? And add in pictures of a family, a home and the word ‘Jesus’ as visuals to support the three main parts of the promise.
Here’s the second example.
Luke 7: 1-10. There, Jesus is asked by a Roman Centurion to heal his servant. So, Jesus heads off towards his house, on the way he gets a message from the Centurion: “You don’t need to come to my house, just say the word and he’ll recover.” And that’s exactly what happens.
So, question is, is it worth trying to get hold of some kind of Roman soldier costume? Well, the answer is, “yes.” And here’s why. The thing we should be trying to reinforce, that is the point of that passage, is Jesus’ authority to command.
The Centurion recognizes that while he can give orders to his soldiers, Jesus has the authority to command diseases and they’ll obey him. That principle is central to understanding this incident.
So a visual aid to help the children understand this point could well be someone dressed in a centurion costume barking out orders to some soldiers. Or if you can’t get a costume then have pictures of Centurions and soldiers.
The Third Example is Mark 9:2-13.
The transfiguration- that’s where Jesus takes Peter, James and John up a mountain and they see Jesus shine in awesome glory and are joined by Elijah and Moses.
The transfiguration
Peter offers to build some tents and God speaks telling them to listen to Jesus. I know it’s pretty obvious but spending your time on putting some tents up kind of misses the point.
That’s because the point to reinforce is Jesus is God’s true son and King.
So a really memorable visual aid could be using a floodlight to give some idea of what it was like for those disciples to witness Jesus’ glory and even better add a recording of a voice reciting God saying ‘This is my Son whom I love.’
These both reinforce the main point- Jesus is God’s true Son and King.
The Fourth Example. Luke 15- The Parable of the Lost Son.
Now in Jesus’ parables with people in them we need to reinforce not just what happens in the story but who the characters represent in real life. So for this, the obvious visual aid would be to dress up the children or your fellow leaders to re-enact the story.
But how to reinforce who the characters represent in real life? Well, how about making some badges or labels to hang around their necks to help explain who Jesus is referring to.
So in this example, the badges would be ‘Father God’ ‘People who realize they need forgiveness’ and ‘People who think they’re good enough’ or something like that.
Our Fifth Example is John 21: The Miraculous Catch of Fish.
Read John chapter 21. Think first about what you most want to reinforce, and then the visual aids where you’d spend your time and effort on.
There is a lot in this passsage. There’s a miracle, there’s another of Jesus’ resurrection appearances, there are 153 fish and there’s a discussion between Peter and Jesus.
But what do you want to reinforce- where would you invest your time?
Hopefully it wouldn’t be in making exactly 153 replica cardboard haddock. Hopefully you’re thinking, “This is all about Jesus’ forgiveness of Peter. It’s about how Peter denied Jesus 3 times and was asked by Jesus 3 times to feed his sheep. It’s about how Peter can serve Jesus despite his pride, weakness and his failure.”
So, maybe you could use your visual aids to link back to his failure in that courtyard by showing the children what Peter said then and what Jesus says to him now. And maybe you could focus on Jesus’ question to Peter and all of us: “Do you really love me?”
So, there are some examples where asking the question ‘What do I need to reinforce’ helps us to decide where to invest our time and effort when making visual aids.
But just before I finish here are a couple of other things to consider in making your visual aids more effective.
First, don’t forget that pictures can be very powerful. There are some great websites which provide free images to help communicate Bible passages to children, plus one or two that charge a fee.
Think carefully, however, before using books or children’s Bibles to provide your visuals- they tend to be trickier to use.
Generally speaking, though not always, the pictures are too small to use with groups of children and the other problem is it’s tempting just to resort to using the author’s words. And if you just read the words you’re not thinking it through yourself and the book will almost certainly not teach what it means and how it applies.
Second, there are loads of more ambitious ideas you can do you can do to bring the Bible alive using visual aids if you have the time and the energy.
I love to use illusions and magic tricks to demonstrate Bible truths. In fact I have written several books on how you can do this.
But don’t forget that the simplest things are usually the most useful in Children’s Ministry – a flat bed sheet, a crown and a rough wooden cross are the three most useful items. Never be without them.
In summary:
Make your visual aids more effective by asking ‘what it is you need to reinforce?’
Remember that pictures can be very effective
Don’t be afraid of more ambitious ideas
Remember that the simplest visual aids are often the most useful.
For more ideas and how-to information, I have written a book on creative ministry. Thank you.