Recent Posts

How to Make Pattern Weights


hardware washers for pattern weights

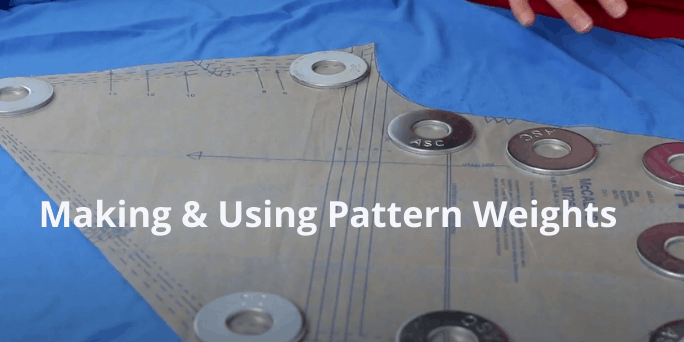
Pattern weights are a great alternative to pins and adhesives.

Using pattern weights to hold your pattern pieces in place can be a much better option than putting pins in or using some kind of tape or other adhesive.

I just wanted to share a quick tip on how to get pattern weights on the cheap. I’ve been searching for pattern roids for quite some time, and I noticed how expensive they really can be.

You don’t want your pattern going anywhere and you can actually keep these in place while you are not only cutting out your pattern, but also making your markings too. You don’t have to use many.

Place your weights along the edges and in the center of your pattern. Now that you’ve got your pattern weights in place. All you have to do is take scissors or your rotary cutter, and literally just cut around it and your pattern will stay intact and in place without using pins. And you can even cut out your pattern markings as well, and everything should stay put.

Depending on the type of fabric you’re using, whether that’s a lightweight or sheer fabric that you don’t want to create runs in the fabric using pins, or maybe it’s a lace that you would have a hard time actually putting pins in, or it’s some kind of full leather or vinyl or something where pins are going to permanently mar that surface, you will want to use the weights.

Now you can find pattern weights at some craft and fabric stores and available online, but you can really easily make your own.

Large washers make great pattern weights

I use washers. I bought the largest washers that I could find at my local hardware store. They’re fairly heavy. They’ve got some weight to them, so they themselves are great pattern weights.

You can use multiple weights in all of the corners or in certain sections of your pattern piece to hold things down so you can cut them. If you find that this is too much weight, you can even go with smaller sizes. Or if your pattern pieces are smaller sizes, you can use these smaller washers. They do not have as much weight to them.

If you want the smaller size, but maybe you want a heavier weight, or even if you want this larger weight or larger size, but more weight to them, you can combine them together and make your own pattern weights and sort of a fun, little pattern, weight bundle.

So here’s a little tip. Hot glue 2 smaller washers together and cover them with fabric or yarn. So it’s double the weight of one and it’s in this nice little fabric bundle that makes it really easy to pick up rather than having to grab multiple weights.

And if you’re worried at all about anything rubbing off from your washer, maybe if you found these out in the garage, you want to make sure they’re protected. You definitely want to cover them in some fabric. So a really easy way to do this is to essentially create a cover around your washers.

You want to start by cutting a circle of fabric that is larger than the washer you want to cover. You can add multiple washers to create a heavier pattern weight.

  • Roughly cut out a circle of fabric. One thing about making these weights is that they do not have to be perfect. You can use a bowl, a cup, whatever you have a trace as a template. And then all you need to do is some hand stitching around the outside edge to gather it in.
  • You want to fold over about a quarter of an inch. Insert your needle from the inside, going to the outside, and then bring it back in.
  • You should be doing a running stitch around the outside edge.
  • Load as many stitches as you possibly can on the needle before you pull the thread through and then just continue on going in and out all the way around.
  • Remember to fold over that about a quarter of an inch as you go, and then just load those stitches onto the needle.
  • Continue doing this all the way around the perimeter of the circle all the way around the outside edge.
  • It’s going to start gathering as you go. And that is fine. You are going to gather it in any way.
  • But once you’ve gathered it in a sufficient amount, you want to pull it as tight as it will go.
  • Hold it with one hand. Then tie a little knot.
  • Bring all of your edges together. Before you clip your threads, you want to go across your opening to bring the edges together.

You can put as many washers in a little pattern way as you want, and then you have lots of fun, colorful little pattern weights to hold down your pattern pieces.

Homemade Pattern Weights

Another way to cove the washers is just to sew them inside of a little bag. Add as many washers as you need to get the weight you desire.

You can also just glue a piece of fabric to each side of a washer and trim. This will give you a cute fabric-covered washer to use as a pattern weight.

Using Hardware Washers As Pattern Weights

I was so excited about these. I just had to share this with you. That’s my little tip for getting inexpensive pattern weights.

I Do Real Magic! Secrets Of The Magician


I Do Real magic – Article by Dennis Regling 

There is always one smart mouth little kid who loves to tell the magician, “You don’t do ‘real magic.'” To them, real magic is what you see on Bewitched, Harry Potter or Charmed. They believe real magic is doing the supernatural.

What they don’t understand is that what they believe to be real magic isn’t real at all. It is fantasy, trick photography and humbug. What they call “real magic,” does not exist.

Only God can do the supernatural. Only God could part the Red Sea, raise the dead and walk on water. 

Unfortunately, the ones who claim we magicians do not perform real magic have a misunderstanding of what real magic is. When an audience member suspends their disbelief, they can experience real magic .

When I tie a rope into a loop and then clip the ends leaving an endless loop, free of knots, jaws drop. When I see an audience member’s jaw drop, or her the soft exclamation, “What the ….,” I know that person has just experienced real magic. 

For a moment, they saw the impossible. Reality kicks back in pretty quickly, and in their rational mind, they know it was just a trick. But for one fleeting moment, there was magic. 

About twelve years ago, I saw a flying saucer. My theology and reason tell me that extraterrestrial space ships do not exist, but for a few seconds one summer eve, I believed. I was driving home from church one Sunday evening. As I topped a hill, I saw a huge saucer-like object flying at what appeared to be only a few hundred feet above me. Narrow on the ends, high in the center, lots of lights and moving silently across the sky. 

My mind raced. One part said, “I do not believe in these things,” another part was wondering where it would land and if I should run across the fields to find it. A flying saucer. 

Then just a few seconds later, as it passed directly over me, I saw what it really was. The illusion was broken. But for a few seconds, I got to experience the thrill of seeing a real flying saucer. If I had passed out at that moment, no one would ever have convinced me it was not. Yet just as quickly, it passed. 

When I put a single sponge ball in a lady’s hand and she opens her hand to see two balls, that is magic. Their expression, the wonder in their eyes tell me that for a brief moment, they have experienced real magic.

We know what we see on TV is not real. There are no sorcerors that can manipulate nature and do the impossible.

What I do is real magic. With the audience’s permission, I take them into a world where for just a moment, magic happens. 

So please stop telling me I don’t do real magic. It just isn’t true. 

What Are The Best Types Of Puppets To Make With Children?


Children love puppets and they love making things. So the question is “what are the best and easiest puppets for children to make?”

The best puppets for children to make will be those that do not use toxic adhesives or hot glue. Sewing should also be unnecessary or easily done in advance by an adult. Some of the ones my girls have enjoyed making are:

  • Spoon puppets
  • Paper bag puppets
  • Simple hand puppets
  • Sock puppets
  • Popsicle stick puppets
  • Simple Marionettes
  • Foam Head Puppets

At age ten, they are also able to do simple sewing by hand and machine, so they have options that may not be available to all parents and teachers to use with their children.

Eleanor made a simple hand puppet.She sewed the puppet on a machine.

Spoon puppets

Wooden spoons make quick, fun stick puppets.

Decorate them with google eyes, felt or craft foam hair and noses. Even use markers to create a quick and easy puppet.

You can also use pom-poms or yarn for hair. Animal ears can be made from craft foam or felt. Pipe-cleaners can make nifty whiskers or mustaches and eye-brows.

6″ Wooden spoons – Great for crafts with kids
Wooden spoon puppets

Paper bag puppets

Lunch bags make simple puppets. The fold makes the mouth. Just put your fingers inside the fold and open and close.

To make your mouth more pronounced, draw lips above and below the fold or a beak or other mouth features.

You can even cut out lips or cheeks from construction paper or craft foam and attach with glue or double-sided tape. Don’t forget to make a tonge for inside the mouth.

Legs or wings can also be made from construction paper or craft foam and attached.

Paper bag owl puppet
Pom-Pom Eyes

Simple hand puppets

My girls can use the sewing machine for simple stitching, so there were able to make the bodies for their puppets on the machine. You may want to sew the body for your child or have them glue the two sides together with Fabric Tac.

Any fabric can be used, but we used some inexpensive JoAnn Fabrics fleece.

  • To make a simple hand puppet, fold over a piece of fabric so the “good side” is inside, or place two pieces of felt together.
  • Pin the fabric so it stays in place.
  • Trace the pattern to the fabric.
  • Sew along the lines you have drawn, leaving the bottom open.
  • Cut out your body about 1/4″ outside the stitch line.
  • Turn body right side out.
  • Decorate with eyes, nose, whiskers, etc.
  • Put on a play.

Free Hand Puppet Patterns HERE

Bunny hand puppet

Sock puppets

DIY Puppets for Kids

Popsicle stick puppets

Popsicle stick puppets are similar to spoon puppets, but you will be cutting out a head from construction paper of craft foam and gluing to the top of the stick.

Eyes, Noses & Ears For Your Puppet

The easiest eyes for children to put on their puppets are googly-eyes. They attach easily with Elmer’s glue or double-sided tape.

Eyes can also be made from craft foam. Cut a circle of white (or your desired color) for the eye. Then add a smaller circle of a different color for a pupil.

Ping-Pong balls make big round eyes. They reall bring character to a sock puppet.

Place the pupils so they are slightly cross-eyes and that actually makes the puppet seem to be focused ahead.

Pom-Poms make fun eyes. Place a smaller Pom-Pom on a larger Pom-Pom to create your eye.

Noses can be made from Pom-Poms, twisted pipe-cleaner or felt.

Rabbit Sock Puppet
Pom-Pom Nose, Felt Ears and Pipe-cleaner Whiskers
Ping-Pong ball eyes and EVA foam teeth

Ears can be cut from felt or craft foam. Placing a smaller piece of contrasting color to a larger ear cut out makes an interesting ear.

Yarn and feather both make great hair for your puppet.

Double-sided tape is great for attaching eyes, noses, and other features when you don’t want to wait for glue to dry.

Simple Marionettes

Marionettes are fun to make and a great way to develop manual dexterity.

How to Make a Toilet Paper Roll Puppet

What You’ll Need

  • 2 toilet paper tubes
  • Water paints
  • Brushes
  • Hole-punch
  • Plastic straws
  • Yarn
  • Craft foam
  • Pipe cleaners
  • Craft sticks
  • Double stick tape
  • Googly eyes or other eyes
  • White glue
  • Scissors

Instructions

  • Paint the toilet paper tubes or cover with colored paper
  • Cut one tube in half for the head
  • Cut the ears out of craft foam or cardboad
  • Glue two Popsicle sticks together to form a cross
  • Punch four holes on the bottom of the body for the legs
  • Thread two 6″ pieces of yarn through the leg holes, adding cut bendy straw pieces for the feet. Knot at each end
  • Alternatively, you can make feet from craft foam and glue to bottom of the legs. A double thickness will help give them some weight
  • On the opposite side of the tube, punch holes at both ends of the body; thread a long piece of yarn (approximately 24″) through the body and head. Tie it to the Popsicle stick-cross
  • Glue on a pipe cleaner for a tail
  • Attach eyes with double-stick tape or glue

You can also make different ears for different animals and even add a trunk to make an elephant.

Based on an idea from the October 2013 issue of Parents magazine.

Foam Head Puppets

Foam head puppets and arm and rod puppets like the Muppets can be fun to make. Both my girls started making them when they were 8 years old.

Do do this with children, you need to know what you are doing. Contact cement or hot glue is used to attach the foam and construct the head and body, so an adult will need to help and supervise this step.

It is really a 2 person job, with both the parent and the child doing parts according to their abilities. When finished, though, your child will have a wonderful memory and a great puppet.

Eleanor made a foam head lion puppet. She made the eyes from plastic spoons and teddy bear eyes. Fleece body, fur mane

Basic Hand Puppet Patterns


These are simple patterns for hand puppets.

Free Puppet Patterns to use, but please share a link to this page, not the patterns. Thank you.

My girls can use the sewing machine for simple stitching, so there were able to make the bodies for their puppets on the machine. You may want to sew the body for your child or have them glue the two sides together with Fabric Tac.

Any fabric can be used, but we used some inexpensive JoAnn Fabrics fleece.

  • To make a simple hand puppet, fold over a piece of fabric so the “good side” is inside, or place two pieces of felt together.
  • Pin the fabric so it stays in place.
  • Trace the pattern to the fabric.
  • Sew along the lines you have drawn, leaving the bottom open.
  • Cut out your body about 1/4″ outside the stitch line.
  • Turn body right side out.
  • Decorate with eyes, nose, whiskers, etc.
  • Put on a play.

How To Assemble A Foam Puppet Head


To create a great puppet, you need to construct a great head.

The steps to constructing a foam puppet head are:

  • Trace your pattern onto your foam
  • Cut out the pattern with a sharp razor blade
  • Apply contact cement to the outside edges of the pattern and in the darts
  • Let cement dry to a tacky feel. Use a hairdryer to speed this up
  • Pinch darts closed
  • Pinch the outside edges together to form the shape of the puppet head
  • Turn inside out
  • Attach mouth plate to puppet head

Patterns are available on our patterns page. Foam and other supplies are available on our Tools and Materials page.

Trace pattern onto 1/2″ foam

Trace your pattern onto your foam

The pictures in this article are of my Pear Head Puppet Pattern.

With a Sharpie, trace your pattern onto 1/2 ” foam. I have marked the edges that will not be glued with a dot.

Cut out the pattern with a sharp razor blade

Never use your good scissors to cut foam. Foam will dull scissors and razor blades very quickly.

Use a fresh razor blade. When cutting the foam, keep the blade perpendicular to the foam. You want a nice square edge.

When cutting, if you start right at the edge, the blade will sometimes tear the foam. Start from the inside and cut outward.

Apply contact cement to the outside edges of the pattern and in the darts

How To Apply Contact Cement To Your Puppet Pattern

  • Apply contact cement to the foam with a brush, or dab it on with a scrap of foam.
  • Do not apply to thick. A thin coat is best.
  • If you want a stronger bond, apply a second layer of cement after the first layer dries.
  • Apply the contact cement to BOTH edges that are to be joined.
  • Allow the cement to dry until it is just tacky. You can use a hairdryer to speed up the process.
  • Pinch the edges together for a permanent bond.
Apply contact cement to both edges to be attached.

What is the best contact cement to use? See what the experts say: CLICK HERE

Barge vs weldwoon contact cement
What is the best contact cement to use?
See what the experts say: CLICK HERE

Pinch darts closed

Once the contact cement dries to tacky, pinch the edges together. Start with the darts.

Pinch the outside edges together to form the shape of the puppet head

Once all the darts are closed, attach the outside edges of the head together to get your final shape.

Pinch the darts closed, then attach the outside edges to finish your puppet skull.

Turn inside out

Turned inside out, the ridges on the darts disappear.

Turn the puppet head inside out and the darts will smooth out. This is optional, but sometimes when pinching the darts closed, you get little ridges. This will hide them.

Attach mouth plate to puppet head

Apply contact cement to the edges of your mouth plate and to where the mouth plate will attach to the head. Let dry until tacky.

Attach the mouth plate and you are ready to cover your head with fleece or latex.

Pear Head Puppet Covered
With Antron Fleece

You can now put the inside of the mouth in, attach your facial features and hair, attach a neck and connect it all to a body.

Go to our VIDEO PAGE for instructions on each of these steps.

To learn how to make a professional quality puppet mouth plate go to: PUPPET MOUTH VIDEO

You can purchase the Pear Head Puppet Pattern and complete instructions by clicking the pic below.

Click to purchase the Pear Head Pattern

Using Puppets With Pre-Schoolers: How to perform for young children.


Puppets and preschool age children seem to be made for each other. Look at the long-term success of Sesame Street, Mr. Rogers and many other TV programs aimed at the pre-school audience.

They all use puppets. Even Barney added puppets.

Young children love animal puppets.

Frame of Reference

The big thing to remember when working with 3-5 year olds is their lack of knowledge. They have a limited frame of reference.

Most humor assumes you know something and then we either make fun of it, which is satire, or we confuse it, using puns. Because of the limited frame of reference for this young age group, we can eliminate most satire.

They don’t get most satire. Clever or witty things will also go over their heads.

So how can you be funny for little ones?

Little kids love to flaunt what they do know. You can use this to your comic advantage.

  • Call things by the wrong name. Call a cat a dog or a blue ball orange. They will correct you and find it really funny that you don’t know your colors or what an animal is.
  • Mispronounce common words. Call a rabbit a rubbit (because I like to rub it), and they will gleefully correct you. 
  • Perform a common task incorrectly. I often will try to blow into the wrong end of a balloon. The children will yell “turn it around.” I will then turn myself around and try to inflate it again. They will let me know that was the wrong way, so I’ll turn the opposite direction. Next try, I will turn it end for end, but a complete 360 degrees so it is still upside down.  This all gets hilarious to little minds and the children’s response is entertaining to the adults.
  • Running gags work well with children. If you even accidentally drop a prop they will laugh. You can do it over and over and they will laugh every time. When you find something that makes them laugh, you can repeat it.

Get down to their level.

Children don’t get most jokes when they are 3 or 4 years old, but they love visual comedy. Snap yourself in the face while trying to inflate a balloon and they will laugh. 

Drop your hat and “accidentally” kick it farther away from you time and again as you attempt to pick it up and they will laugh until you stop.

Remember, children have had limited exposure to things you find commonplace. Even well-known songs are new to them. You may think it will be funny if you sing a song wrong (works for Weird Al and Alan Sherman), but if the children don’t know the song, the humor will be lost.

Funny Animal Puppets

Little kids love animals, so an animal puppet is a great choice for this age group. The cuter the better.

Sometimes kids will want to show how smart they are by yelling out that the puppet is not real or that it is a puppet. I like to reply with, “Don’t tell him, he thinks he is real.”

Some children LOVE to tell you the puppet is not real. This is NOT the appropriate response.

Try to avoid hard-wood ventriloquist puppets. Those can be very scary to little ones (and my wife says they are creepy). 

With any puppet, if you can make it act shy before it comes out, or ask the kids not to “scare the puppet,” you can help them relax around your little friend. This is especially more important the younger your audience.

Ways to use the puppet to create laughter

  • Use the puppet to perform a magic trick. 
  • Use the puppet in a game of “you didn’t see it.”  In this little “game,” the puppet will do something when you are not looking. The kids will yell for you to look, but you never see what is happening. This can be repeated over and over. 
  • Have the puppet steal a hanky from your pocket or sneeze and wipe his nose on your jacket. 
  • Have the puppet drop things or pronounce words wrong. 
  • Have the puppet pronounce your name wrong. Then you can have a little back and forth with you correcting the puppet again and again. 

Funny stuff to pre-schoolers. Children love it when the puppet gets the best of you.

Roscoe is always trying to trip me up.

The Fear Factor

I already hinted at this. Some children get scared by puppets. School-age kids seem to love things that are creepy, ugly or grotesque, but little ones don’t. Even something like a wolf puppet for Little Red Riding Hood can be very scary to a 3 year old.

Keep the puppet on the quiet side. You may have it whisper in your ear, and you repeat what it said. Or have it speak softly, calmly.

Loud noises and loud voices can be very scary to a 3 or 4-year-old. If something is loud and surprising, it can bring tears.

Your own personality should be gentle and calm. Win the children’s confidence. Let them feel safe.

When twisting balloon sculptures at festivals, I like to let my wife handle the little ones. She will kneel down and her voice is soft. I tend to be louder and more intimidating.

The same child that can laugh at a clown on television or a monster in a cartoon may start crying when meeting a clown in real life. 

Not because the clown is scary, but because they are large, close, and unfamiliar. I believe that is why hardwood puppets are also scary. They are unfamiliar and often they features are exaggerated in a strange way.

How To Perform For Libraries, Preschools and Daycares

  • Don’t be over the top with noise or actions that may appear aggressive to a young mind.
  • Use actions more than words.
  • Use animal puppets that are cute and cuddly.
  • Always be kind to your puppet. Never hit or yell at your puppet.
  • Do things the children can understand and follow.
  • Think like your audience thinks.

Want to make your own puppets? Visit Puppet Building World